
*HOW TO USE SITE*
Welcome Plainedge High School Class 1971 Classmates!
If this is your first visit, read below to see how to get started - it will answer all of your questions on how to get a password, make a profile and how to use the website. Make your profile page and personalize it by adding pictures, YouTube Videos, and Playlists. Discover how to do it all right on this page!
It is completely free to our classmates. You will never be asked to pay to make a profile. Donations gladly accepted!
You have the option of restricting your personal Profile to only fellow Classmates, which blocks the general public and search engines from accessing your Profile details. Once you create a Profile, you will also be able to see all Profiles of your fellow classmates and interact with them. Simply check the box that say's only registered classmates can see your profile.
PRIVACY
All contact information that you enter into this website will be kept confidential. It will NOT BE SHARED or distributed. Your contact information is private: your address and phone number can't be seen by the classmates unless you grant permission on your Profile. When someone clicks on your name, the only contact information they will see is your city and state and whatever information about yourself you choose to put on your Profile. Your email address is not visible, although an email can be sent to you using the contact box at the bottom of your Profile page. Note, however, if you send a message to someone through their Profile page, the Classmate will see your email address so that they can respond.
If you have not already done so, you will need to create your individual Profile in order to access any password protected pages on this site.
Start by clicking on the Classmate Profiles link.
As time goes on, please remember to keep your profile up-to-date with current contact information, and enjoy using this site as a portal to reconnect with old friends between graduating years. Click on a link below.
Married Couples - Sharing the same email address for login: Married couples who share the same email address: Make sure you each have unique passwords for your logins. This is how the website differentiates you.
Getting Started: Please take a few minutes of your time to create your Classmate Profile. Click the Classmate Profiles tab in the top left navigation. You will be taken to a listing of the Plainedge HS Class 1971 alumni. Click on your name and follow the instructions to create your login and password. If you cannot find your name on the Classmate Profiles page, then please use the Contact Us page to have your name added. Once you create a profile, you will also be able to see the profiles of your fellow classmates and interact with them. You don't have to finish your profile all at once. Come back whenever you want to add to or update your information, or add more photos.
DON'T LET OUR EMAILS GO INTO YOUR JUNK FOLDER: Please add (or allow) the following email address to your "Safe Senders" list so that your spam blocker will allow emails notifications from this website: noreply@Classcreator.net
FORGOTTEN PASSWORD: If you forget your password, just click on the "Forgot Password?" retrieval feature under the login feature, and it will be emailed to you.
WHAT IS "REMEMBER ME"?: If you click "Remember Me" when you log in, you will not need to log in next time you go to the site. You can log in from computers other than your home computer but you will need to enter your password. On computers that you're planning on using in public places such as libraries, do not check this.
TROUBLE WITH EMAIL AND PASSWORD LOG IN: Your computer is not retaining cookies. A cookie is a little piece of data stored on your hard drive and is used by Class Creator to maintain the login system. Although cookie problems are rare, when they do occur you have several resolutions. Try any of the following:
- Make sure you are logged into your web site.
- Upgrade your browser to the most recent browser.
- Switch browsers. For instance if you are using Internet Explorer, try Firefox.
- Clear your Temporary Internet Files (cache) and clear your current cookies so you are starting fresh. Click here for instructions for clearing browser cookies.
- Make sure you are doing nothing to block cookies on the web site. Our login system depends on cookies working. If you are blocking cookies in general, you need to at least permit them for this web site so you can log in.
- Reboot your computer.
Aren't cookies bad? Answer: No. The "cookie scare" of the late 1990s was largely based on misconceptions that cookies stored on your computer's hard drive somehow violated privacy. Erroneous information regarding cookies has long since been corrected, and cookies are a common programming practice used today by some of the Internet's largest websites. There is nothing that our website does with cookies that will in any way jeopardize your privacy, store personal information about you, or submit your personal information to other websites.
How to upload pictures to your profile:
- You can upload .jpg, .gif, .bmp and .png files, but not .tif. If you want to edit your pictures but don't have a picture editing program, you can download a free one from www.irfanview.com. You can crop out anything you don't like. You don't need to resize your pictures, as they will automatically be resized when you upload them to your webpage.
- When you are ready to add your picture to your personal web page, make sure you are logged in from the Home Page.
- In the links on the left side under MEMBER FUNCTIONS, click on the link: Edit/Upload Photos.
- The Photos for (your name) page will appear and you’ll see a box at the top titled: Upload New Photo. Click on it and you will be at the Upload page.
- Click on the box Add Files. A dialog box with a list of folders on your computer will appear. Locate (browse to) the folder that holds the picture you want to add. For most classmates this will be the My Pictures folder located in the My Documents folder. If you are in the icon view, change your view button (at the top) to show icons as pictures. This makes it easier to find the specific picture you want to upload.
- Click the Upload button to add the picture to your photos. You will now be back at the page Photos for (your name). The next step is to Sort your photos and add a Caption.
- Sort: The Sort number controls the order in which photos display on your page. There are 99999 sort numbers. If you assign Sort numbers 7, 45, 99999, 1, 300, your pictures will show in this order: 1, 7, 45, 300, 99999.
- Add a Caption: Caption is the description you write for your picture.
- If you want to choose one of your pictures to be your Master Photo, click in the Master Photo circle for that picture. Your Master Photo will appear in your emails and forum posts.
- Click the SAVE CHANGES button.
- Now go to your Profile page (Click on Classmate Profiles in the left navigation bar) and look for your picture and caption.
- If your photos are really large on your profile page and you would like them smaller, it’s easy to do. Go back to Edit/Upload Photos. Scroll down to the photo you want to resize. Click on the Resize button underneath the photo. A box will pop up. There will be a slider bar at the top of the box. Drag it to the left to make your photo smaller. When it’s the size you want, click Save. Return to Classmate Profiles and your profile page. If the photo isn’t smaller, click the Reload button on your browser (the button that looks like an arrow or arrows going in a circle) and it should reload and be a smaller size.
How to delete a photo from your profile:
- Choose EDIT/UPLOAD PHOTOS under MEMBER FUNCTIONS from the left-hand navigation column. All the photos on your profile page will be displayed.
- Click in the DELETE box above the picture(s) you wish to zap.
- Choose SAVE ALL CHANGES. A pop-up box will ask, "Do you really want to delete this 1 photo."
- Click "OK" and the photo(s) will be removed from your Profile Page.
How to put a YouTube video on your profile page:
(Please note that if you know html, you can add videos and photos to any part of your profile page.)
On the YouTube website, make sure your video is showing in the play box.
Example: you want to put "Graduation Day By The Four Freshmen" video on your site. (If you want to follow along, the URL is https://www.youtube.com/watch?v=OOVOllNHSis.)
To the right of the video you’ll see a gray box, and near the bottom of this box is the grayed word “Embed.” To the right of "Embed" is a horizontal white box that contains the code for the video. When this code is placed in the Video box on your Edit Profile page, the video player with your video will appear and classmates can view it from your page.
Here are the steps to get the code on your page:
- With your mouse, left click once on the white window that contains the code. It should turn blue. (Alternately, you can move your mouse across the box until all the code turns blue.)
- On your keyboard hold down the CONTROL key (Ctrl) and press the letter "C" key. This copies the code.
- On your Edit Profile page, locate the box "Videos."
- Place your cursor inside the box and left click with your mouse.
- Now press the CONTROL key and the letter "V" key on your keyboard. The Embed code will now appear in your box. The code should look like this:
<object width="425" height="344"><param name="movie" value="https://www.youtube.com/v/OOVOllNHSis&hl=en&fs=1&"></param><param name="allowFullScreen" value="true"></param><param name="allowscriptaccess" value="always"></param><embed src="https://www.youtube.com/v/OOVOllNHSis&hl=en&fs=1&" type="application/x-shockwave-flash" allowscriptaccess="always" allowfullscreen="true" width="425" height="344"></embed></object> - In the Video Description box just below, enter a name for your video or something about your video, like: “Remember Graduation Day?” This will appear just below your video.
- Now click the Save button and go view your page.
Member Functions: Edit Contact Info
Choosing this feature will allow you to view all of the contact information you entered into your contact information page. You can change your contact info anytime it is necessary.
Be sure to click the SAVE CHANGES tab at the bottom of the page when you have finished.
Member Functions: Message Center
This feature lists all the emails you have received (IN BOX) as well as those you have sent (OUT BOX) through this web site. Your messages will remain in their respective boxes until you delete them.
A KEY at the top of both the IN BOX and OUT BOX shows symbols representing the status of an email. You will find one of these symbols to the left of each email listed.
Each listed email shows: (1). A box to check, (2). Its status; (3). Either who sent it to you (IN BOX) or who you sent it to (OUT BOX), (4). Subject and date of email, and (5). A red "X."
In both the IN BOX and OUT BOX settings, clicking on sender's name brings up that person's profile page and clicking on the subject brings up the actual email.
Clicking inside the box on the far left or on the red "X" on the far right, will turn the background red. This means that the email can be deleted by choosing the tab at the bottom of the page that says DELETE CHECKED THREAD.
Member Functions: Edit Contact Info
Choosing this feature will allow you to view all of the contact information you entered into your contact information page. You can change your contact info anytime it is necessary.
Required fields of entry are:
1. First Name
2. Last/Maiden Name
3. Primary Email. Enter email address. Email address also serves as site
login address.
Optional fields are:
1. Alternate Email(s). Enter 1 or more email addresses, if you would like to receive duplicate copies of emails sent through the web site. If you only want 1 copy, leave these fields blank. Please note, only your primary email address can be used to log into the web site.
2. Street Address. Your street address is visible only to the Site Administrator and is hidden from your Classmates unless you specifically choose to share this information in your Profile area.
3. Street Address 2. Same street address privacy rules above apply to this field.
4. City
5. State/Province
6. Country
7. Zip/Postal Code
8. Telephone. NNN-NNN-NNNN
9. Cell Phone. NNN-NNN-NNNN
10. Birthday
11. Receive Emails
Note that we will never use personal information for anything other than contacting you regarding issues directly related to the Plainedge High School Class Of 1971 web site.
Be sure to click the SAVE CHANGES tab at the bottom of the page when you have finished.
Member Functions: Edit Profile
Choosing this feature will allow you to change the information that shows on your profile page. Be sure to click the SAVE CHANGES tab at the bottom of the page when you have finished. You have the following controls over your profile:
Profile Visibility: Allow only fellow Classmates to view my Profile details. This will block the public and search engines from accessing your Profile. Leave this box unchecked if you wish to allow the public (friends, co-workers, family members, etc.) to view your Profile details.
Contact Details: Allow Classmates to see my address and phone number (this information is hidden from your Classmates unless you check this box).
Birthday: Allow Classmates to view my Birthday. This option allows Classmates to see your Date of Birth in your Profile and on the home page 30 days prior to your Birthday.
Classmate Comments: Allow Classmates to enter comments under my Profile. (Most users opt to leave this feature on. You have the ability to edit or delete any comments left under your Profile.)
Member Functions: Edit/Upload Photos
To add photos to your profile you must be able to locate exactly where the picture is on your computer. Most of the time, it will be in the folder titled MY PICTURES. Follow the directions further up on this page for adding, deleting, and editing photos.
Member Functions: Post Announcement
When you have information you think would be of interest to classmates, you can create your own announcement. The announcement will be forwarded to the administrator who will make it go live on the Home Page.
Member Functions: Profile Subscriptions
Place a checkmark next to each Classmate you wish to keep track of. When the Classmates you have selected update their profiles you will be notified via email. It's a great way to keep track of your friends
You can also subscribe to Classmates who have not yet joined the site, which will generate an email to you when the Classmate joins.
Subscribing to Profiles will also notify you when a Classmate has an upcoming Birthday.
Member Functions: Change Password
If you wish to change your password, click on CHANGE PASSWORD under Member Functions. A page with 3 sections for you to fill in will appear.
- Type in your PRESENT password.
- Type in your NEW password.
- Type in your NEW password a second time.
- Click on SAVE button
Member Functions: Log Out
The majority of our users select the "stay logged in" option when they log in. Therefore, they will always be logged onto the site until they click the LOG OUT link under Member Functions.
When somebody selects the option to stay logged in, our system allows the user to bypass the login screen when they come back to the site. If you LOG OUT, the next time you will need to enter your email address and password to get into the site. Also, if you access the site from a different computer (for example a laptop), you will need to reenter your email address and password next time you use your main computer.
If you forget your password, click on the forgot password below your log-in email name, and it will be emailed to you.
FORUM ETIQUETTE:
Forums are intended for reconnecting with old friends, making new ones, sharing memories and stories, as well as current interests. So let’s be courteous to everyone on our website.
In order to participate in Instant Messaging the only requirement is that you have the latest version of the Adobe Flash player. If anyone you're attempting to chat with is having trouble with the Instant Messaging feature, they should go to www.adobe.com and upgrade to the latest version of the Flash player.
The Members Online panel is positioned to the lower right of the web site. It can be expanded by clicking anywhere in the title (top bar) area. Clicking the title area again will minimize the window. To chat privately with a fellow member simply click his or her name in the Members panel. Each Member's name you click on will spawn a private messaging window as seen below. You can open up to 4 private messaging windows at any 1 time.
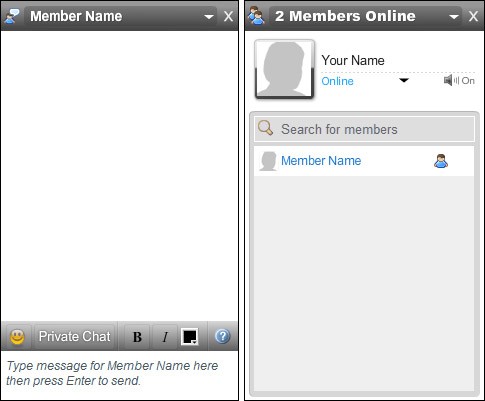
Chatting with another member is simple: Click your mouse anywhere in the bottom region of the window to enter your message then press your <Enter> key to send the message. That's all there is to it — you can now easily chat with fellow members as you browse the site.
SCREEN RESOLUTION: For best results use a screen resolution with width of 1280 pixels or greater. Any of today's wide screen monitors will have at least a 1280 resolution. At this size the Members panel will never cover any site content. If you are using a smaller screen resolution the Members panel will cover site content, but it can be easily minimized or closed completely by clicking the X in the upper right corner.
YOUR PHOTO: Your "Master Photo" is displayed at the top of the Members panel. All messages in the chat window are also preceded by your Master Photo. If you have no Master Photo you will see a default image. Your Master Photo cannot be set from within the Instant Messaging interface. To set your Master Photo click on the Edit/Upload Photos link on the web site and follow the directions on screen.
SEARCH FOR MEMBERS: If there are many members logged in at the same time, you can quickly search for members by clicking "Search for members" in the Members Panel and entering the first few letters of the member's name.
SOUNDS: A sound will be heard whenever a new member logs into the web site. Another sound will be heard every time a member sends you an instant message through the web site. Sounds can be disabled by clicking the speaker icon in the Members panel.
ICONS
![]() Online
Online
![]() Has not typed anything for 5 or more minutes
Has not typed anything for 5 or more minutes
![]() Member is currently typing
Member is currently typing
Should you forget what the icons mean, hover your mouse pointer over them and the member's status will expand like this:
![]()
![]()
TIP: Hovering over a member's name will pop up a window allowing you to quickly jump to the member's Profile page.
TOOL BAR: The icons on the tool bar allow you to insert emoticons, bold and/or italicize your text, change font color, and quickly jump to these help instructions. You can also start a Private Chat session.
PRIVATE CHAT: Clicking the "Private Chat" button in the tool bar allows you to jump to a larger private chat environment that allows the sharing of photos, webcam feeds, and YouTube videos. You can also invite additional members to the private chat. You can start as many Private Chat sessions as you'd like (as long as you can keep up)!
CHANGING YOUR STATUS: At times you may not wish for members to see you online. In the Members Panel you can change your status to any of the following:
Online: You are currently available and accepting Instant Messages.
Away: You are online, but not currently at your computer.
Do Not Disturb: You are online but wish to block incoming Instant Messages.
Can I turn off my Instant Messaging (IM) feature temporarily? Yes. Click on the ‘X’ in the upper right hand corner of the IM Member online. You will get a pop-up saying: “You are about to turn off the Instant Messaging Feature. If you wish to turn it back on, simply close your browser and come back to our website.” Once you come back to our website, you might have to log back in.
Can the IM window be moved? No. It works best along the bottom of the screen. You can launch up to 4 IM windows at any one time. Although these windows do pop up in front of site content, they can be easily minimized or closed. You have full control over what IM windows appear and when.
Can I start more than ONE (1) Private Chat? Sure you can. You can be in unlimited simultaneous Private Chats; if you can keep up with it.
Will IM work on my iPhone or Smartphone? No. Most don't support Flash to this day. At least for the moment, if you want to IM you'll need to use a regular computer. We are working on a non flash version.
PANELS DESCRIPTION
|
LEFT PANEL: This is where conversation occurs. At the bottom of this panel is the Control Bar. The Control Bar is used for controlling various elements of your chat. Messages can be entered under the Control Bar. Pressing the Enter Key or clicking the Send button makes your message visible to all participants. All messages in the conversation window are preceded by your "Master Photo". If you have no Master Photo you will see a default image. Your Master Photo cannot be set from within the Live Chat interface. To set your Master Photo click on the Edit/Upload Photos link on the web site and follow the directions on screen. NOTE: New members joining the chat room will see the last 20 entries made by other participants, allowing them to quickly see the current conversation and begin participating. UPPER RIGHT PANEL: This is the "Media Window." Members in the chat room can use this window to share photos, YouTube videos, and live webcam feeds. These items can be shared by using the Control Bar. LOWER RIGHT PANEL: The Members panel shows who is in the chat room. To the right of each member's name you might see any of the following icons:
Should you forget what the icons mean, hover your mouse pointer over them and the member's status will expand like this:
NOTE: All member names are clickable to their Profile pages. If you want to know more about the person you're chatting with, click on their name and their Profile will launch in a separate window. |
|
|
|
The Control Bar is used for sharing media and adjusting font, font size, and font color.
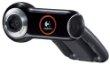
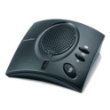
OPTIONAL EQUIPMENT If you want chat participants to see and hear you on webcam, you'll need a webcam and a microphone. In order to eliminate sound echo you must ensure sound emitted from your computer speakers cannot travel back through your microphone, causing a sound loop (the source of echo). Echo can be avoiding by utilizing a headset or headphones, or by using a microphone or speakerphone with echo canceling technology. If you need a webcam or microphone compatible with this Live Chat system here's some we recommend:
WEBCAM TROUBLESHOOTING Q&A:
Question: I use my webcam with other applications. Is that a problem? Answer: Possibly. Close all software before starting a new webcam session Sometimes after you finish using the webcam in a software application, the program may not properly release the webcam for other activities in other applications, or even the same application. Sometimes you cannot use the webcam because it is being accessed by another program by default. So, if you are having a problem with your webcam, close the program you are using it in, reboot your computer, and then try using the Live Chat application again. Question: Should I do anything with webcam drivers? Answer: If everything else has failed, try downloading the latest drivers and updates for your webcam. Some webcams may not be recognized by the Live Chat application unless you have the most recent drivers and updates for your webcam. If you installed the webcam separately, go to the webcam manufacturer's website and download the latest drivers, updates, plug-ins, or conversion utilities for any webcam video software. TIP: Be sure to verify the webcam drivers and software are compatible with the OS version of Windows or Mac you are using! Question: Nothing has worked. I think I need to buy a new webcam. Any other suggestions? Answer: Sometimes new hardware is the only solution. While waiting for your new webcam to arrive, have you considered using a laptop computer with this Live Chat? Most laptops sold today come with a built-in webcam. If you are still having problems, please Contact us. CLICK THE NOTES TO GO TO OUR MUSIC PAGE INSTEAD
Now staying in touch with our Classmates is easier than ever! You can now do all of the things you can do on our class web site from inside Facebook. You don’t have to open another browser window to go to our website (unless you want to). First, here are few important things you should know:
Now, follow these 3 quick steps to get connected to our website through Class Connection on Facebook:
That's it - you're Facebook connected! Remember: Class Connection is 100% as private and secure as our class web site. Your Profile privacy settings on our website are honored on the Class Connection Facebook app. TIP: For quick access to Class Connection while in Facebook add to Facebook Favorites (http://www.classconnection.com/assets/images/favorites.jpg)
There are some exciting new features available here such as the ability to send your Notify Me notices to the Facebook notification globe. You can use the Easy Invite tool to help us find missing classmates and invite them to join our class. Class Connection also provides a Visit Another Class feature that allows you to browse around other classes. Here are some quick videos to help guide you through the easy- use of the new Class Connection Facebook app: Privacy: https://www.youtube.com/_eHf7tWS8sE
Privacy has always been and will always be one of our top priorities. User information on our website is kept confidential, private, and secure. This will continue to be the case with the new Class Connection Facebook application.
Profiles, Photos and Videos: https://www.youtube.com/NlmdySdCLac Finding Classmates: https://www.youtube.com/vWZ6Pfi6P1s and https://www.youtube.com/FQrMdnPG-b0 Visit Another Class: https://www.youtube.com/tHvbK3wJY8g
(Just like when the public visits your class web site, all security settings are honored by the Class Connection app. Pages you have restricted to viewing by classmates only can only be accessed by members of your own class. Classmate Profiles that have been restricted to classmates from your own class can only be viewed by classmates from your own class on the app. Nothing changes regarding privacy and security settings).
App Synchronization: https://www.youtube.com/TdNTG5GXGtc What's New Page: https://www.youtube.com/xUgXpo0-QJc If you have any problems or questions, let me know. Play around with the app….have fun. I hope you enjoy this new Facebook connection for our class!
|
|||||||||||||||||||||||||||||||||||||||||||||||||||||||


